Categories
Food & Wine Food & Drink

Cooking with Spinach

Spinach, the meatiest of vegetables, is finally in season. The fleshy leaves of spring spinach are juicy with a potent green serum that’s high in iron and exceptionally rich in chlorophyll, which is a close chemical relative to hemoglobin, the red stuff in blood.

This time of year, spinach is so abundant one can cook with it by the handful. Spring spinach comes in waves, the first of which was planted last summer as a fall crop and coaxed through the winter under a blanket of snow. In spring, the overwintered spinach rages to life, with leaves that are as sweet as they are lusty.

These leaves grew from roots that were well-established last fall, as opposed to the second wave of spinach, planted months ago in greenhouses. It’s about the same size as the overwintered spinach, but lacks the experience and terroir of the elder plants, which have had more time to accumulate nutrients.

Young spinach, including the so-called baby spinach that’s all the rage, is very convenient. It barely needs washing or any form of prep and is as tender as veal. It may not have the sweetness of an overwintered spinach, but neither does it have the bitterness.

The final wave of springtime spinach hits right before solstice, when the field spinach gets big and leafy. It won’t be as sweet as overwintered spinach, but it will be just as meaty.

Assuming you have the good stuff, then, what to do?

If you can get the good stuff, the overwintered green crème, then I’d recommend a very simple pesto with nothing more than spinach, olive oil, and salt. This is a spectacular way to enjoy the subtle complexity of an overwintered spinach. Like a vegetal blood transfusion in your mouth.

The leaves of springtime spinach clean easily. A blemish on a leaf can be tolerated in pesto, the sausage of plant foods.

If your spinach is good but not quite top level, a more typical pesto with nuts, cheese, garlic, and zest will be a very satisfying way to enjoy the season. I’ve also had great results by simply combining fresh spinach pesto au natural with year-old basil pesto from the freezer.

The next recipe comes by way of Bhutan, a little Buddhist country in the Himalayas, where chile is king and cheese is queen and all other foods are cooked in a combination thereof.

Bhutanese spinach with chile and cheese

1-3 ounce dried red chile

four handfuls of spinach

½ to 1 cup Mexican cheese blend (or ¼ – ½ cup feta)

salt (unless using feta)

water or stock

cooking oil

First, get the chile soaking. Rip out the stem ends of the pods, tearing off the good bits of flesh and discarding the stems, inner seed heads, and as many seeds as you wish for the desired heat level. Tear up the leathery walls of the chile pods or leave them intact, depending on how avoidable you want the pepper pieces to be. Cover with water and soak.

Meanwhile, mince a medium-sized onion, and sauté it in olive oil and maybe a little butter. Add the half-soaked chile, and allow to cook, covered, with the onions. After about five minutes on medium heat, add two or three handfuls of spinach — as many as you can fit in the pan — in whole leaf form. If things are on the dry side, add water or stock, a half-cup at a time, until the pan bubbles with deliciousness. Cover.

After about five minutes, the spinach will have cooked down. Add more spinach if you can push it in, ideally another handful or two, and then add the cheese — ½ to 1 cup of Mexican blend, depending on how big your cheese tooth is. Some Bhutanese expats will occasionally use feta — if so, mind the salt. Cover again for about five minutes, then stir until all the cheese has melted into the sauce.

Add more water or stock as necessary so it doesn’t dry out. If the cheese burns it will be a chewy, lumpy mess; but if the pan is properly hydrated, the cheese will dissolve into a luxurious gravy. Add salt to taste, and serve with jasmine or basmati rice — or better yet, Bhutanese red rice.
Categories
Food & Wine Food & Drink

’Tis the Season

We egg snobs have it good in spring. Whether we get our eggs from a farmers market, a farmer friend, or one’s own backyard flock, we get them fresh. Especially these days.

Most hens slow down or even take an all-out lay-cation during winter. But when spring hits and the world wakes up, the girls get happy and productive.

Freshly laid eggs will elevate any egg-based dish, but the best way to appreciate a quality egg is going to be the simplest. For me, it’s all about the yolk, so I take mine soft-boiled.

To the fictional Padre Xantes, from Peter Matthiessen’s At Play in the Fields of the Lord, his daily egg yolk was a temporary reprieve from the pious life he had chosen. Padre Xantes kept a special spoon that he used to open his daily soft-boiled egg, “… taking great pains, for the egg was so little cooked that its white was scarcely clouded.”

Carefully, with his tongue, Padre Xantes would work the flaccid sphere to the back of his mouth and then try to relax for a moment, “… until, unable to restrain himself a moment longer, he clamped it savagely twixt tongue and palate, uttering as he did so a tiny squeak of pleasure; the yolk exploded in abandon, mounting deliriously toward his sinuses, then sliding past the roots of his tongue into his throat.”

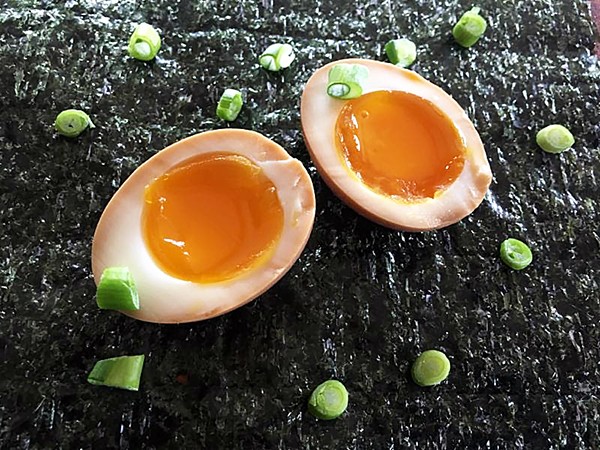
Many Asian cultures have a way with barely cooked egg yolks and enough tricks to keep Padre Xantes perspiring through centuries in purgatory. Today, I will discuss how to soft-boil eggs with the brightest, most custardy, molten creamy yolks inside and float them in a dark umami marinade.

Ari LeVaux

Fresh eggs, as usual, are preferable for this job, but in this case they do have a liability: When boiled, they are impossible to peel. The shell breaks into little pieces that stick to the white, pulling chunks of fleshy albumen and leaving a pockmarked moonscape.

There is a fix for this predicament, a process in which all chicken keepers and their associates should be drilled. Literally, you drill a little hole, by twisting a thumb tack or small finish nail between your fingers (or with a real drill) into the wide end of the egg, where there’s an air pocket between the shell and the sac that holds the egg. As long as you don’t go more than an 1/8-inch past the edge of the shell, you won’t poke the inner membrane.

Take your newly drilled, fresh eggs, or your non-drilled, old eggs (at least three weeks old), and carefully place them into a pot of boiling water for six minutes. Immediately transfer them into a bowl of ice water for five minutes. Peel them in water, carefully, as the eggs will be soft beneath the shell.

If you’ve ever had a fancy bowl of ramen noodle soup with a half-cooked egg inside, that’s kind of what we are going for. The dark marinade stains the outside of the egg white, while the inner part of the white remains bright white and the yolk stays golden and gooey.

Here are my two favorite marinades:

For a more Japanese-style: three tablespoons soy sauce; pinch each garlic powder and black pepper; 3/4 cup of water. Optional and recommended: 1 tablespoon dried bonito flakes; 1 sheet of nori, crumbled into little pieces; a few drops of sesame oil.

The Chinese-style marinade that makes me squeak like Padre Xantes: 3 tablespoons soy sauce; 1 tablespoon each bean sauce and hoisin sauce; 2 tablespoons sugar; 1 cup water. Bring briefly to a boil, and then let cool.

In your marinade of choice, submerge the eggs for at least six hours, in a plastic bag or a cup. Eat plain or on hot rice.

You can also gussy up your soft-boiled egg Italian style, with truffle oil and shavings of hard cheese.

Or with less flourish, Padre Xantes-style, with just a pinch of salt.

Categories
Food & Wine Food & Drink

A Secret Weapon for Your Pantry

If you’re like me, you went through a balsamic vinegar phase soon after you “discovered” it.

Venturing beyond its traditional habitat in the salad bowl or drizzled on the occasional strawberry, you poured it on rice, added it to your favorite pickle recipe, and perhaps even used it in a stir-fry.

In my case, at any point where the bite of a little acid was needed, I went with balsamic, until I was pretty much sick of it. Balsamic vinegar is not mayonnaise, I realized. It does not make everything taste better. There are places where the fruity, syrupy sweetness and wine-like complexity is too cloying, heavy, and distracting. There are dishes that we do not want to taste like balsamic, and you have to pick your spots. Perhaps your balsamic phase ended with a similar resolution.

More recently I’ve become enamored with an offshoot of balsamic vinegar that’s a lot more versatile and a lot harder to overdo. For years, it went by the name white balsamic vinegar, as it’s made with similar ingredients.

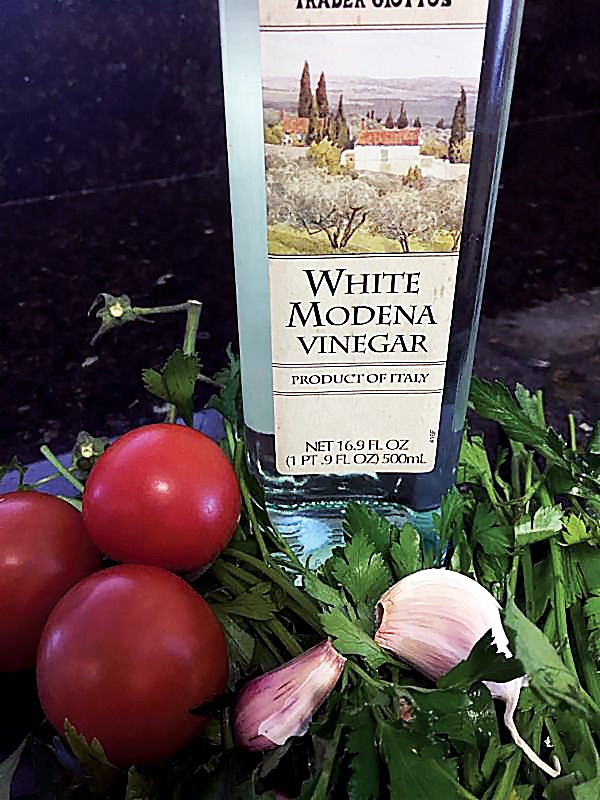
Due to some legal constraints that I’ll discuss in a moment, it’s no longer available as white balsamic but can be found under the names white Modena vinegar or white Italian condiment.

Whatever you call it, many enthusiasts consider it simply to be an alternative to traditional red balsamic vinegar for those times when you want that sweet, tangy, balsamic-y complexity without the dark red color. But that simple distinction ignores the fact that the differences in flavor are significant.

It’s brighter, with more tang, and with less heavy sweetness and a lighter finish. Unlike its darker cousin, white balsamic vinegar won’t hijack the flavor of your meal and is content playing a supporting role. It’s also tremendously versatile, and even if you don’t love it enough to add to your A-list of condiments, it can be used in a pinch to substitute variously for rice vinegar, white wine vinegar, sherry vinegar, and even champagne vinegar. It’s near-impossible to confuse with its red cousin, even with your eyes closed.

The name “white balsamic” is no longer permitted in order to protect the “DOP” status of red, or true balsamic. DOP stands for Denominazione di Origine Protetta, which translates to Protected Designation of Origin. It can be found affixed to some of Italy’s finest and most celebrated foods, including cheese, extra-virgin olive oil, wine, prosciutto — even pesto.

[content-1]

Not all of these products get this designation by any means, not even the ones from Italy. Only the ones made with ingredients local to where the finished product was produced and processed with rigid adherence to traditional production practices. The DOP designation marks many products imported to the United States, so if you’re in the market for an Italian product and see that one of the options has the DOP designation, then your choice just became much easier.

Wine makers in Modena have been making balsamic vinegar for about 1,000 years, via a process similar to that of making wine. It’s made from white trebbiano grapes from the Emilia-Romagna region.

The grapes are pressed into “must,” which is a mixture of grape juice and the leftover skins, seeds, and stems from the grape clusters. The must is simmered for hours, during which time it caramelizes, darkens, and thickens. The syrup that results is aged in barrels of oak, cherry, chestnut, mulberry, juniper, and other types of wood. Often it’s more than one type of wood per batch.

The word “balsam” refers to a sticky resin that leaks out of cut trees and is used in perfume and other aromatic products, and these various types of woods help to explain why. Twelve-year -old balsamic vinegar is the standard, though it’s possible to find bottles that have been aged 20 years or longer.

If you get your hands on some aged balsamic, it really is a treasure. A few drops, not nearly enough to add any significant amount of acid, will add untold levels of aromatic fruity complexity to a dish.

[content-2]The white version is much more of a common man’s vinegar and isn’t available in DOP versions. With that being said, if I had to choose just one for my pantry, I would choose the lighter. Its production begins with the must of those same trebbiano grapes, but in this case, white wine vinegar is added. The resulting mixture is cooked at a low temperature to ensure it doesn’t caramelize or darken. It is sometimes aged in oak, other times in stainless steel, but never for more than a year.

White Italian condiment doesn’t exactly roll off the tongue, but it’s a name worth getting used to, along with white Modena vinegar, if you want to acquire some. In the privacy of your own home, you can call it what you wish. And whatever you call it, you should definitely use it.

While balsamic vinegar draws all the attention to itself, its lighter cousin does the opposite, so you won’t find dishes built around it. It’s a laborer in the kitchen and does a great job on many fronts. You can deglaze with it or add it to marinades and even pickles.

I’ve written before about thin-sliced onions languishing in a white Italian condiment bath before being added to salads, and I stand behind that tactic. I’m also quite enthusiastic about drizzling some on my avocado toast, with olive oil, onion, and tomato. Here are a few more recipe ideas.

[content-3]In my home, our biggest use for white Italian condiment is in salad dressing. We do a mixture of 3 parts olive oil and 1 part vinegar, with the vinegar portion consisting of equal parts cider vinegar, balsamic vinegar, and white Italian condiment, with soy sauce to taste (optional). The pairing of three vinegars, two of which having balsamic tendencies, adds a sparkling depth to the dressing. Redundancy, at least in the context of food, can be a very good thing.

[content-4]

And finally, a simple, Italian-style roasted red pepper snack: Halve and de-seed some red bell peppers, and broil until the skin browns and blisters. Place in a paper bag and let them cool for about 10 minutes. Remove the skins, slice into bite-size pieces, and toss with olive oil, fresh-pressed garlic, capers, and white Italian condiment. Season with salt, and serve.

Categories
Food & Wine Food & Drink

Making the most of a coconut.

I highly recommend smashing all new coconuts on the pavement outside the grocery store, immediately after purchasing them. Keep a lightweight bowl on hand with which to capture the water that will drain out, and give it a drink. If it tastes anything less than stellar, bring back the coconut, and trade it for another. Nothing wrecks my buzz, not to mention the gravy, faster than spending five bucks on a coconut, only to discover at home that it’s a dud. That’s why you must figure this out before leaving the premises.

Assuming you have a good coconut, the next step is to prepare coconut milk. Of all the many plant-based “milks,” like soy milk or almond milk, coconut milk is the most truly milk-like, thanks to its saturated fat. Refreshing and satisfying to drink, it is in cooking with it that coconut milk really shines. Fresh coconut milk will change ordinary ingredients into an extraordinary dish. Especially if you add ketchup.

Og-vision | Dreamstime.com

Yeah, ketchup. All great fats have their traditional counterparts, and coconut is no exception. Bacon and eggs need coffee in order to taste proper, while olive oil is at its best when combined with vinegar. Coconut is its own fat source, and, as such, demands its own acid. In the Eastern Caribbean, the acid of choice for that role is ketchup. Or tomatoes, I should say. Fresh tomatoes and tomato paste are often used, but ketchup is preferred.

So with those bits of coconut theory under the belt, let’s dive into some practical concerns. Like what, exactly, are we supposed to do with our coconut and ketchup?

Preparing the milk is the heavy lifting in the preparation of a rich coconut gravy, which is fundamental to most coconut-based savory dishes. Nowadays, coconut milk is available in cans. It isn’t bad that way, but fresh is preferred.

In the tiny village of Petite Soufrière, Dominica, we had a cooking teacher named Audrey. Before retiring, she was a beloved school teacher, which made her quite the companion. Wherever we went, faces lit up as greetings were made to “Teach-um Audrey,” as she is called. After a lifetime of peeling and grating coconuts, Teach-um Audrey was happy to let my wife and I make the milk. We let her turn it into magic.

Hitting the coconut all over with a hammer — or the dull side of a machete — will loosen the flesh and make it easier to extract. After you get the flesh out, preferably without slicing open your hand, the next step is to grate the flesh. This should be done with the zesting side of a typical grater. Doing so takes longer than it would to use the grating faces, but you extract more of the good stuff that way.

When the coconut white is grated (don’t worry about the thin brown skin around it), add a cup and a half of water for each coconut, and mix it together with the coconut in a bowl. Take little handfuls of the waterlogged coconut shreds and squeeze them into the bowl, and put the squeezed handfuls aside. If you have a mesh bag or fine strainer, use them to extract even more milk from the flesh. When all the coconut has been squeezed dry, the remaining liquid is coconut milk.

I’ll leave you with Teach-um Audrey’s recipe for Codfish Sancoche, a popular Creole dish in Dominica. In addition to coconut and ketchup, it makes use of salted cod. Like a mature coconut — and ketchup, for that matter — salted cod is stable at room temperature and requires no refrigeration. Thus, it’s a very inexpensive form of fish, and for that reason, as well as for its delicate salty flavor and flaky flesh, imported Canadian salt cod has remained an island favorite for centuries. It’s available online at Amazon and elsewhere, but if you want to substitute with the fresh fish of your choice, be it cod or some other, by all means, go for it. Any salt water fish will do. Salmon is unexpectedly good in coconut gravy.

Codfish Sancoche

Remove salt from a pound of salt cod, either by boiling it for around 30 minutes or soaking it overnight. Drain, cover with a little water, and set aside.

Prepare coconut milk: Extract and zest the flesh, add 1 ½ cups water per coconut, and mix it around and squeeze out all the milk. Set aside the spent flesh for the birds.

Simmer the coconut milk with whole cabbage leaves or paw paw (green papaya) for 30 minutes. Add saltfish, along with cut up seasonings like hot or sweet pepper, garlic, onions, and turmeric (“If you get fresh, it’s good. Otherwise, powdered is fine”).

Here is my favorite part of the recipe:

“Add ketchup to taste.” Add a bit, stir it around. Make further adjustments to the acid level by adding vinegar or lime juice. Boil for 30 minutes, and serve, with rice or plantains. Anything to soak up that precious red-gold gravy. You won’t want a single drop to go to waste.

Categories
Food & Wine Food & Drink

Mastering pho

I tend to do my cooking by improvisation, but that doesn’t work with pho, despite its apparent simplicity. The broth is elusive, even if you know what the ingredients are. Inevitably, one or more of the spices will come on too strong, resulting in more of an unbalanced cacophony than the understated, harmonious symphony that has conquered the slurping masses.

My numerous failures left me discouraged, with no other choice than to head for my local pho shop to get my fix. But this drought ended when Andrea Nguyen, the undisputed authority on Vietnamese food in America, was kind enough to email me the keys to the kingdom.

I found myself on a list of recipe testers for Nguyen’s masterful new cookbook, The Pho Cookbook (Ten Speed Press, 2017). My main assignment was to help replicate and troubleshoot the recipe for pressure cooker pho, a method that expedites the usual hours-long simmering of bones behind your typical bowl of pho.

Other than the wholly unexpected addition of a quartered apple — Nguyen’s substitute for Vietnamese rock sugar — there weren’t any surprises in the ingredient list. I’d used them all before in my previous failed attempts.

John Lee

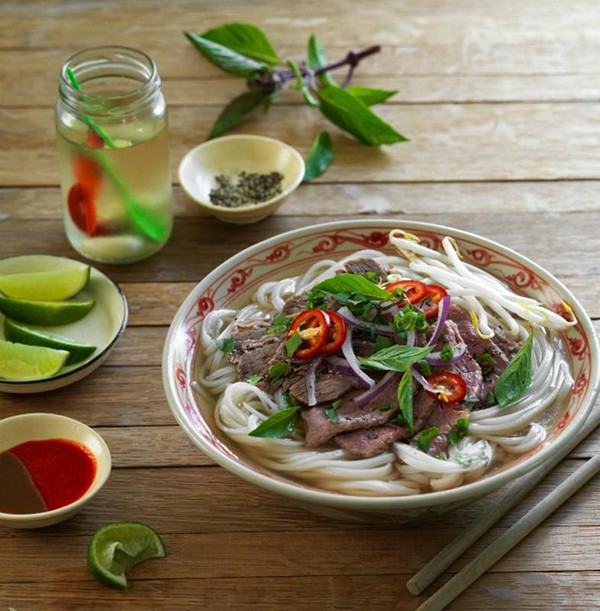
Pressure Cooker Beef Pho

PRESSURE COOKER BEEF PHO

Adapted with permission from The Pho Cookbook by Andrea Nguyen
(Ten Speed Press, 2017)

Ingredients

Broth

3 lbs beef bones

1 lb beef brisket, unsliced

2 ½ star anise pods (20 robust points, total)

1 3-inch piece of cinnamon

3 whole cloves

1 small Fuji apple, peeled, cored, and cut into thumbnail-size chunks

Chubby, 2-inch section of ginger, peeled, thickly sliced, bruised

1 large yellow onion, halved and thickly sliced

2 ¼ teaspoons fine sea salt

2 tablespoons fish sauce

1 teaspoon sugar

Bowls

10 ounces dried, narrow rice noodles

Cooked beef from the broth, sliced thin

4-5 ounces thinly-sliced raw beef steak

½ small red or yellow onion, thinly sliced against the grain and soaked in water for 10 minutes

2 thinly sliced green onions, green parts only

¼ cup chopped fresh cilantro

Black pepper, to taste

Optional: bean sprouts, chile slices, mint, Thai basil, lime wedges, hoisin sauce, Sriracha sauce. (Nguyen gives recipes for homemade versions of hoisin sauce, chile sauce, sate sauce, and garlic vinegar)

Procedure

Rinse bones.

Toast the spices on medium heat in the pressure cooker for a few minutes, shaking or stirring, until fragrant. Add ginger and onion; stir until aromatic and slightly charred.

Add four cups of water to stop the cooking process. Add the bones, brisket, apple, salt, and five more cups of water. Lock the lid, and pressure cook for 20 minutes at 15 psi or higher.

Remove from heat. Allow pressure to go down to the point where you can open the pressure cooker. Season with fish sauce, salt, and sugar if desired. Remove the meat, soak in water for 10 minutes to prevent drying, and set aside until serving time. Refrigerate the broth to make it easy to skim fat, if desired.

While the broth is cooking, soak the noodles in hot water until pliable and opaque. Drain and rinse, and drain again. Divide among four bowls. At serving time, dunk each portion of noodles in boiling water, then replace in the bowls. Top with the brisket, steak, onion, green onion, cilantro, and pepper. Heat the broth to a boil, and ladle into the bowls. Dive in and add condiments to tweak flavor. Invite people over to enjoy your handiwork while you assault them with pho puns. Your audience will be captive until the pho runs dry.

Categories
Food & Wine Food & Drink

Foiled Again

You might be surprised to learn that the most prestigious pieces of meat are among the least flavorful of cuts, well behind the ones that you can’t even chew.

The most flavor resides in the least expensive cuts like shank, chuck, shoulder, brisket, flank, and, if you can get it, neck. These, the toughest and the cheapest, keep their flavor hidden in their collagen, the tough, fibrous, protein-rich gristle that crisscrosses the chewier cuts of meat and holds all of the meaty fibers together.

The question is, how do we melt that gristle without letting the meat dry out? It’s a bit of a trick, but the methods are many.

Tom Moertel

Braised oxtail

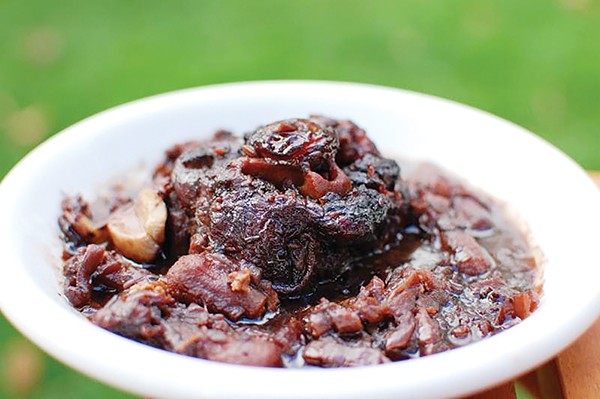
Barbecuers conduct a culinary alchemy in smoky, low-heat conditions, inside welded contraptions that can be as big as train engines. Stew- and broth-makers do it in simmering kettles, while braisers melt their collagen in the oven, half-submerged in pans with tight-fitting lids.

To a certain extent, acid helps break down collagen as well. Some vinegar in the stew pot, a long, tangy marinade for the flank steak, or some wine in the braise will all help speed the process.

All of these methods, in their own way, deal with the problem that collagen doesn’t melt below 160, but meat begins to dry out above 130. The barbecuers baste continuously with their vinegary sauce. Soup makers and braisers do their business underwater, where drying out is difficult.

I’ve been enjoying a technique by which I wrap my meat tightly in tinfoil, push it into the oven, and forget about it. This setup essentially steams the meat in its own juices, injecting the moisture right back into the meat as it tries to escape.

The ease with which this method can be employed is staggering. The other day, I took a hunk of bone-in elk shank from the freezer and immediately wrapped it in foil, still frozen solid. Into the oven it went, at 325. I proceeded to forget about it for the rest of the day. No salt, no herbs, no additions of any kind. It came out divine but was not so much a finished product as a worthy ingredient. With added salt, raw onions, and cilantro on tacos, it wore the salsa like a champ.

Brining the meat first in salt water will help it retain even more moisture. And if you put your hunk of collagen-reinforced meat under the broiler, a tasty, crispy brown skin will develop. This will help contain the juices to an extent and will add a caramelized complexity that only browned proteins can muster.

Add other flavorings before you foil it. Lemon and dried apricots and harissa and olive oil, if you want a North African feel, or cumin and red chile if you like tacos, or rosemary, thyme, and olive oil if you want something like an osso buco.

I recently braised with garlic powder, herbs de Provence, and white wine, with a few bay leaves. I’ve also added pomegranate juice and seasoned with soy sauce instead of salt. It’s a forgiving technique. When you have your flavorings figured out, tightly foil your brined, browned meat. As it cooks, some juices will inevitably find their way out, but the fewer the better.

When liquid from the meat begins weeping from the foil, don’t let it go to waste. Without a response it will dry out and burn into a bitter, black crust on the pan. If there is a lot of this jus, I will collect it and make it into a sauce down the road when the meat is ready. But another way to harvest those escaping juices is to pave the bottom of the baking pan with sliced roots and tubers, like potato, carrot, parsnip, celeriac, onion, and garlic.

Now that you have your creamy, tender, and juicy meat, begin exploring the ways to use it. You’ll run out of meat long before you run out of options.

Categories
Food & Wine Food & Drink

A Climate Denier’s Happy Meal.

If you’re the kind of person who would make a lifestyle change based on its impact on the climate, you’re probably already aware that your food choices impact the molecular balance of the atmosphere in ways pertinent to life as we know it. By some estimates, half of human greenhouse gas (GHG) emissions are released by the production, transport, preparation, and waste of food. Thanks to population growth and economic development, that portion is growing.

This reality has spawned a foodie tribe known as the climatarians, members of which, according to The New York Times, adhere to a “diet whose primary goal is to reverse climate change.” You might think of climatarians as allies to the locavores, fellow do-gooders trying to save the world by eating carefully. But their agendas are not always aligned. It turns out that the distance food travels makes less of a difference to the carbon footprint than how that food was produced.

Many studies indicate concentrated animal feeding operations, or CAFOs, are more efficient than raising grass-fed animals because the operations benefit from the economics of scale. They are more efficient, the animals grow faster, and are ready for slaughter sooner, so they end up producing less methane over the course of their lives. The emission of methane, a much more potent greenhouse gas than carbon dioxide, is a big reason animal products are shunned altogether by many climatarians. Others will try to keep their meat but eat it as efficiently as possible. While the average omnivorous locavore may balk at the idea of a fast food burger, a climatarian might pull into the drive-thru, turn off his engine, and marvel at the efficiencies of the modern food system while awaiting his turn.

Better than a Happy Meal

To determine the most anti-climatarian meal ever, I used an online tool called the Food Carbon Emissions Calculator, created by a company called CleanMetrics. Top of the list is red meat, with lamb being the worst — nearly 12 kilograms of atmospheric carbon is released per pound of meat. So while lamb is certainly on the menu, we need to make sure it’s the right lamb. Most of the lamb consumed in the U.S. is from New Zealand, from where it must be shipped, frozen. Shipping something from around the world that grows perfectly well in the U.S. seems about right. And then we don’t have to worry about local, pasture-raised lamb, because that, likely, won’t be bad enough.

We need to select a cut of lamb that requires the most cooking, releasing as much carbon dioxide as possible. We want to cook it for hours and serve it with out-of-season sides and creamy desserts.

The main course will be braised lamb shanks, aka osso bucco. Shank is the only part of a lamb’s body that could benefit under extended cooking, thanks to its being the toughest (and arguably tastiest) part of the lamb — so tough it needs to be cooked for hours to render it chewable. In order to waste as much energy as possible, we will braise the shanks in a big oven rather than a more efficient crock pot.

While a head of California lettuce shipped across the country would only set the climate back about 0.2 kilograms of atmospheric carbon, if we can import the same thing out of season — raised in a greenhouse in Sweden, for example — then we are talking four-and-a-half kilos of carbon dioxide. That’s nearly twice the carbon impact of Norwegian lobster, at two and a half kilograms.

While a vegan diet is generally going to be better for the climate than what we would enjoy at the Brazilian barbecue, the Swedish lettuce example shows that blind allegiance to vegetables could cause you to do more damage to the climate with that salad than you would have done with a lobster roll. I, for one, would lean toward the lower emission lobster.

Altogether, a climate denier’s Happy Meal of braised osso bucco with Swedish lettuce and artisan Wisconsin cheese plate could generate about 21 kilograms of carbon dioxide. A meal of lentils, vegetables, and rice, on the other hand, comes in at about half a kilogram. We could throw in a bottle of wine and still be under a kilo. That, and the occasional Norwegian lobster, would keep you well-fed and guilt-free.

But the most important take-home from this exercise is that if you put a little thought into where your food comes from, you don’t need to blindly follow any one ideology. With a little brainpower, you can assess for yourself how good or bad food is, for yourself and the world.

Categories
Food & Wine Food & Drink

Beet Theory

Beets are a challenging food. No vegetable feels so much like work — or tastes so much like dirt. Which surely means beets must be supremely good for you.

But dense tubers are problematic to mess with. You can’t just riffle through the fridge, find some beets, and add them to your rice pilaf like you can with kale or a spare carrot. Beets will take over anything they touch, spreading their reddish purple hue and earthy sweetness to places where they may not be welcome. As it colors your food, beet will even dye your insides, as you will be reminded in a few hours.

Beets are a commitment. Cooking them takes a certain kind of mental preparation. You need to kind of take a deep breath first, as you would before diving into water or participating in hand-to-hand combat. If you don’t psych yourself up a little, or if you get a little too relaxed in there, things could get ugly.

Beets do not shine in single pot meals, unless that meal is beets. Like dark and mysterious horsemen that turn out to be good guys, beets often ride alone. I can’t help but notice that beets clash with a lot of my favorite foods, like eggs, noodles, rice, beans, hot peppers, and basically anything at a potluck. The easiest way to love a beet, generally speaking, is to keep it away from everything else.

Consider pickled beets, which everyone loves, especially if they are in a bowl, next to some toothpicks with which you can cleanly spear one and then toss. When not in use, pickled beets are safely enclosed in hard, impermeable glass jars that prevent their contents from mixing with corn flakes, milk, and other non-approved substances. You take what you need from the jar, do what you need to do, and close it. Just don’t break it, because a broken jar of beets is more of a problem than, say, dilly beans.

Here are two of my favorite ways to cook beets in solo fashion, along with a bonus: how to secretly add beets to one of the most popular foods in the world.

Ari LeVaux

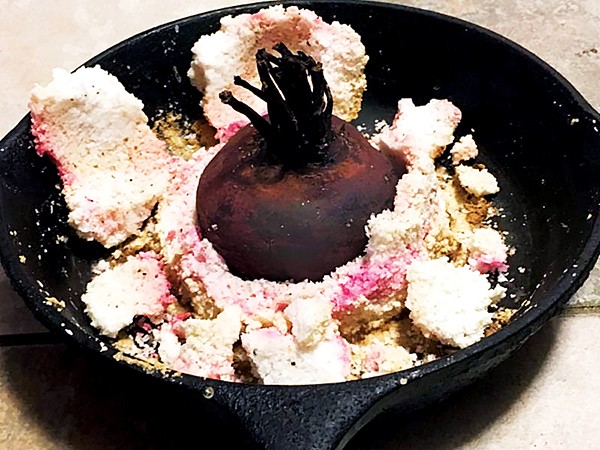
What beats a salt-crusted beet as a go-to introduction to the joys of this red tuber? Beats me.

Beet Chips

Trim the tops and bottoms, and peel the beet skins if you wish. Cut each beet in half, tip to top, and lay the flat sides down. Slice as thinly and evenly as you can, ideally about a ¼-inch thick. Toss the slices with olive oil, and then add salt, garlic powder, and black pepper. Bake at 350 for about 45 minutes, or until they develop a dry skin that cauterizes the purple red flow. Be careful not to overcook, as their sweetness will quickly turn to bitter. Let them cool and serve with double balsamic vinaigrette: 1 tablespoon each of red balsamic and white balsamic vinegar, and olive oil.

In addition to being tasty treats in their own right, these chips are a useful ingredient in other recipes, especially ones that call for beets that, for whatever reason, you want to tone down the beet. Sometimes, for example, I roast beets like this before making borscht; that roasted skin helps the beets restrain themselves from oversharing.

Salt Crusted

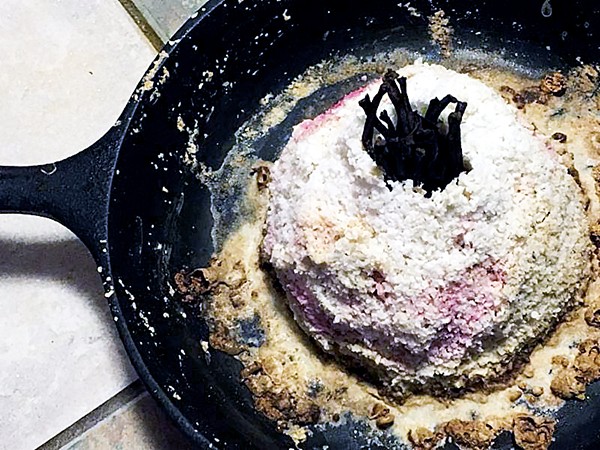
This is the ultimate in hermetically sealed beet segregation. The throbbing root is contained within a rock-hard castle of chaste-white purity. It appears, from the outside, as if a hydrothermal vent from the bottom of the ocean set up shop on your frying pan. And it requires, without question, a gratuitous use of salt. I haven’t figured out a way to re-use it, besides repackaging it and selling it as some exotic pinkish salt, so I end up throwing it away, as it’s no use in the chicken yard or compost pile.

While it uses more salt than is necessary for cooking a beet, what it does, nonetheless, is special. If you’re looking for an impressive way to help someone appreciate a beet, this is it.

You will need about a cup and a half of salt per beet.

Trim a flat spot on the beet’s bottom, and leave up to an inch of the tops.

Mix a cup of salt with a teaspoon each of black pepper and garlic powder, and stir in about a quarter cup of water. Work it together until it reaches the consistency of a snow cone that’s just cold enough to not be drinkable by straw. If it’s too wet, add more salt and mix it in.

Put a wad of this salt mortar on the bottom of a cast iron pan or other baking dish. Place the beet on top, and pack the salt around it. Mix up more salt mortar if you need it. When fully encased, bake for one hour at 350.

Remove the dish, and while it’s cooling, figure out how you’re going to break the beet free of its salt tomb. A hammer works. I would not try whacking it with a jar of pickled beets, as the baked salt is very hard.

When the crust is broken, remove the beet, and brush it off. The texture is supple, and the flavor is a deep sweetness that is seasoned but not upstaged by the salt.

Serve it sliced, drizzled in double balsamic vinaigrette. To put it over the edge, make slices of brie or other creamy soft cheese available. On the side, of course.

Stealth Beets

And if one does feel the need to add beets to an existing dish, I would pick one that already shares the relevant flavors and colors of the beet. Chocolate cake, in other words.

It may sound crazy, but grating some beet into your favorite chocolate cake recipe is a pretty sweet move. Literally. The bitter and sweet flavors of beets mirror similar qualities in chocolate, allowing the beet flavor to disappear into the chocolate. Ditto for the color. Chocolate is one of only a handful of foods that beets can’t stain.

An average-sized box of cake mix can accommodate about a cup of grated or pureed peeled raw beets. If you don’t believe me, try with just half a cup. You won’t notice much except maybe a little more moistness.

So yes, beets can, in fact, play well with others. But for me, in day-to-day, non-cake-eating life, my beets won’t be mixing with much more than salt, vinegar, garlic powder, black pepper, and oil.

Categories
Food & Wine Food & Drink

The veggie burger that bleeds.

Vegetarians, at long last, will no longer have to fake their hamburgasms. The debut of the most meat-like veggie burger ever, at NYCs Momofuku Nishi, has made a big, bloody splash in the food world — and especially in the burgeoning plant-based foods community. The appropriately named Impossible Burger sizzles like a burger, sending delectable clouds of meaty umami through the air. It browns like a burger, and this pleasing crisp skin manages to contain the juices that run blood-red when bitten into. People who regularly eat meat are lining up to pay 20 bucks for one of these bleeding burgers, invented by Silicon Valley-based Impossible Foods and retailed by the famed restaurateur David Chang.

The Impossible Burger is meaty enough to satisfy the experts, as Business Insider correspondent and dedicated meat-eater Linette Lopez observed. “If Chang had told me that I was eating a burger made of rare bird meat or some small woodland creature, I wouldn’t have been surprised. If he had told me that it was meat made from the wisest, noblest seal in the Arctic, I would’ve paused — but more importantly, I would’ve kept eating.”

For environmental, human health, and animal welfare concerns, plant-based fake animal products are all the rage these days, and I’ve been consistently disappointed in nearly all of them. Despite the accolades attached to the Impossible Burger, I had no reason to believe it was going to be anything more than pie in the sky, until I learned how it’s made.

The folks at Impossible Foods are using an ingredient I’d learned about decades ago, when I was getting a biology degree. I remember my plant physiology professor’s excitement about a molecule called leghemoglobin, and its role in nitrogen fixation, the process by which leguminous plants like peas or beans are able to create their own fertilizer from the air.

Leghemoglobin is short for legume-hemoglobin. Hemoglobin is the molecule in blood that grabs oxygen from your lungs and ferries it to your cells. Leghemoglobin, the vegetal version of hemoglobin, is red when attached to oxygen. But the reason your peas and other legumes don’t bleed is that leghemoglobin is found in the roots.

The folks at Impossible Foods are cultivating leghemoglobin in vats, and it’s fitting that veggie burger blood is found in legumes. This is the plant group that is frequently tapped by vegetarians for its protein content. The fact that plant-based blood comes from these subterranean protein factories is intuitively pleasing.

This potato protein and coconut oil-based burger tastes like blood, which means that people want to eat it, myself included. As they are available only at Momofuku Nishi (a second restaurant location for the Impossible Burger is being teased in San Francisco for this fall), I might have to suffice for the real thing. Then I had another thought.

Twenty years ago, in plant physiology class, we played with root nodules from soybean plants. I remember their blood-red interiors when we sliced them up and have a distinct memory of wanting to taste them. Alas, eating bio lab supplies was frowned upon, so I never did.

The next morning, as my children slept peacefully, I went to the garden and started digging up their pea plants like a deranged grave robber.

I knew exactly what to look for, having dug for them in college. There they were, pink on the outside and reddish on the inside, clinging to the fragile pea roots. At long last, I finally bit into a bloody root nodule. I tasted that big, metallic, bloody flavor, like the taste of a busted lip. I also tasted a strong pea flavor. I didn’t have enough nodules for a salad, but a dish based on them is an intriguing possibility. I fried a few in bacon grease and they were delicious. Maybe that’s kind of cheating, but if you had told me that those were animal-based bits I was crunching on, I would have believed you.

My pea nodules may have been a far cry from being a real hamburger, but I could see the promise. Writing this column required reading a lot of beautifully illustrated articles about America’s favorite sandwich, and today when I take my lunch, it will be a hamburger made of real beef, for lack of an alternative.

But if you told me that tomorrow’s lunch would drip legume blood instead of mammalian hemoglobin, I would be there with my bib on.

Categories
Food & Wine Food & Drink

A new potato salad is a blank canvas.

New potato salad recipes abound online, as do those for normal potato salad. Some versions are tossed with sour cream-based dressings rather than the typical mayo. Others use a simple vinaigrette. A cilantro chutney makes a fine potato salad sauce as well.

Most potato salad recipes call for boiling or steaming the potatoes. I get it. Cooking them this way helps prepare the cut surfaces to really grip the sauce. Nonetheless, I prefer to oven-roast my potatoes, which adds a browned, caramelized flavor. Admittedly, this treatment cuts down on their adhesiveness to the sauce, but not prohibitively so.

I recently made a new potato salad with a bunch of spuds that were as small as they were new: baby fingerlings from the farmers market. They were so small that I didn’t even cut most of the spudlings before roasting them. That, in principle, should have further inhibited their grip on the sauce, but it didn’t matter. I tossed my salad in a batch of homemade garlic and dill mayo, and it held together beautifully.

Beyond the choice of dressings, a potato salad is a 3D blank canvas in many other ways as well, into which you can incorporate the fruits and leaves of summer’s progression. Fresh peas, snap or shelled, can be tossed in at the very end, as can chopped celery. Parsley, dill, or cilantro can be chopped and added, but you will probably want to choose just one of those dominating herbs. Any protein, from tofu to bacon to shrimp, can be added, along with whatever else summer can throw at you. Green onions (aka new onions) are preferable to chopped bulbs, but either will do. That fennel root sitting in your fridge, which seemed like such a sophisticated purchase at the time but now have no idea what to do with? Your new potato salad will swallow that up, along with more misfit produce than grandma’s seven-layer leftover casserole, but with a finished flavor that’s fresh and crunchy.

(Counterpoint: My wife disagrees with me completely. She prefers her potato salad to have just potatoes, olive oil, salt, garlic, and greenery, such as parsley.)

I roasted the new potatoes along with whole cloves of new garlic and rounds of carrots. I should have peeled the garlic first, but I didn’t. I tossed these roots with oil, sprinkled them with salt and garlic powder, and baked at 350 on a tray, stirring occasionally. If you happen to have any garlic scapes, chop and toss them in for the final minutes of cooking.

Be warned: This is a tasty mixture. You should probably roast extra of this rootsy mix for the kitchen vultures, because they will surely be circling. That fennel root could be roasted too, but I prefer to serve it raw and crunchy.

Let this cool before mixing with your uncooked veggies. Then mix together whatever raw veggies you’ve assembled, toss in the dressing, and serve.

The dressing could be Dijon sauce, or balsamic vinaigrette, or something with crème fraîche, but if you find yourself at a crossroads and aren’t sure which way to turn, you can’t go wrong with mayo. Admittedly that’s kind of my motto in general, but especially so here.

I will leave you, thus, with my recipe for dill mayo:

Crack an egg into a food processor, or better yet a cup into which your submersible hand blender can plunge. Add slices of fresh garlic and the juice of half a lime. Blend until everything is fully liquefied together. Slowly add olive oil, in the thinnest of streams, as the mixture whizzes. After you’ve added about a ¼ cup, increase the flow of oil until another ¼ cup as been added. Blend another moment, then continue whizzing and pouring until it thickens into mayo and the oil starts to pool on top. Then, add chopped fresh dill, blend again, and stir it into your new potato salad.